
Benefits
- Creates a central repository for the storage of research
- Allows a method for researchers to communicate, contribute to and use researched data prior to publication
- Provides a coherent method for locating relevant information for both researchers and the wider public
- Enables us to share the results of the hard work in an attractive manner to the world
Becoming a researcher
To become a Heritage Project researcher email [email protected] with:
- Your first and last name
- The email address you wish us to use to communicate with you
- Suggested articles and proposed categories
We can then get back to you with login and details of any other activity taking place associated with your proposals. We will put researchers in similar fields in touch with each other to prevent duplication of effort and enable collaboration.
Considerations
Our research has to be searchable both on the website itself and by search engines. To allow this to take place it is necessary for a site wide classification structure:
Category >> Subcategory >> Article (Post)
For example:
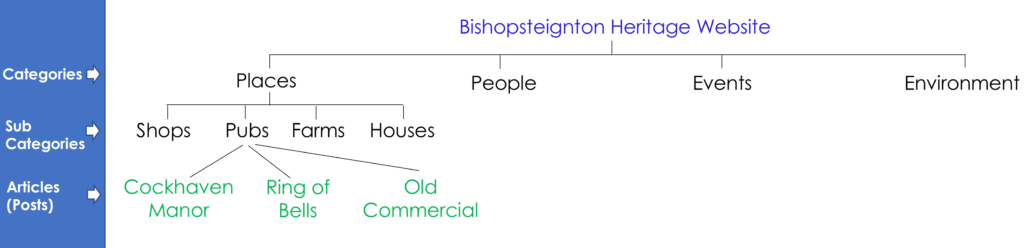
The top level of categories is kept small and generic to allow easy access into the site.
Subcategories can then be added according to the research that has been carried out – for instance “Churches” could be added below “Places” in our example.
Subcategories can also have further subcategories. In our example we could have “Past” and “Present” below “Pubs” before the articles relating to each of the pubs themselves.
This enables us to grow the website and the indexing of the data in the storage in a manner that allows us to find it again later!
Articles (or Posts) are where the actual research is stored and displayed. They can belong to multiple categories and/or subcategories – An article about a building that is now a house but used to be a pub could possibly be found:
Places >> Pubs >> Past >> Building Article
Or
Places >> Houses >> Fore St >> Building Article
The exact hierarchy will depend on the nature of the research so will vary accordingly. The important thing is that there is one! For the most part this will be taken care of at a curatorial level, however it will be helpful for researchers to suggest appropriate categories when suggesting topics that they wish to write posts about.
The actual categories will be set at curator level in order to keep the website as easily navigable as possible, but suggestions are welcome when submitting an article.
Logging in
Once you have received your login credentials navigate to www.bishopsteigntonheritage.co.uk/wp-admin to enter username and password. This will bring you to the dashboard. You are now in the “back end” of the website.
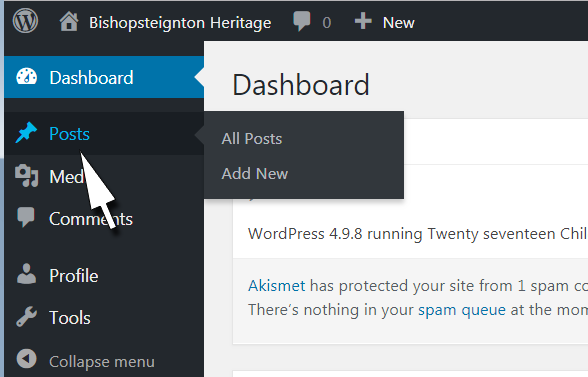
Accessing articles (posts)
Hovering over “Posts” in the side menu will give you access to existing articles and also to create new.
Clicking on “All posts” will unsurprisingly take you to a list of posts. These can be filtered so you can see all posts, your own, draft (unpublished), private (only contributors can see them in the front end of the website) and published (the world can see them). Additionally you can filter by date of most recent update or category.
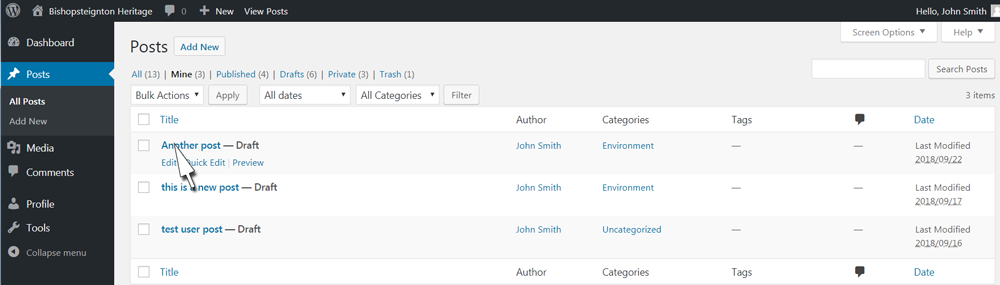
From here you can edit posts you are associated with and view those you have permission for.
Creating a post
By clicking on any of the various “Add new” links you are presented with a form for creating an article. We’ll look at each field in turn.
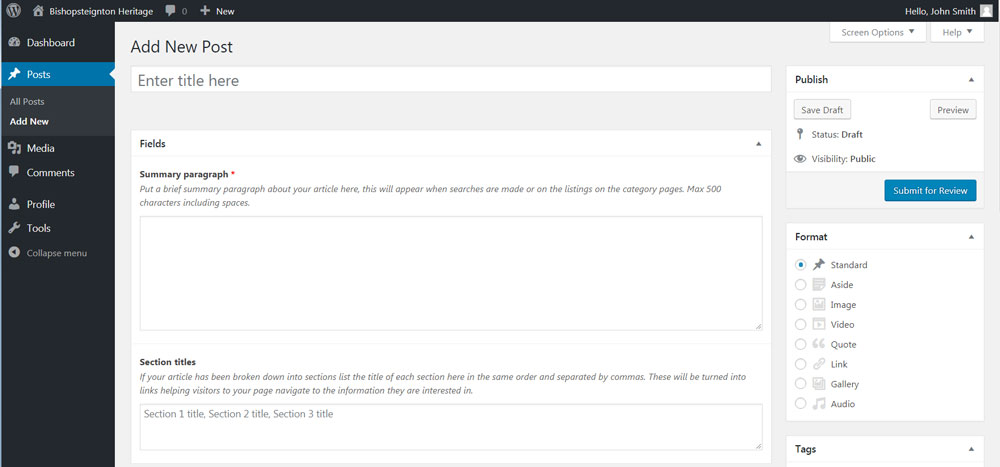
The title goes at the top of the post, is included in the article’s web address and features in results for searches made on and off the site. This should be as descriptive as possible without being over long. If for instance the article is about the property you live in the “27 Example Street” is a much more useful title than “My house”.
The summary paragraph also features in search results and listings on the site. It will also be the first paragraph to appear on the article. Try and sum up your article in two or three sentences.
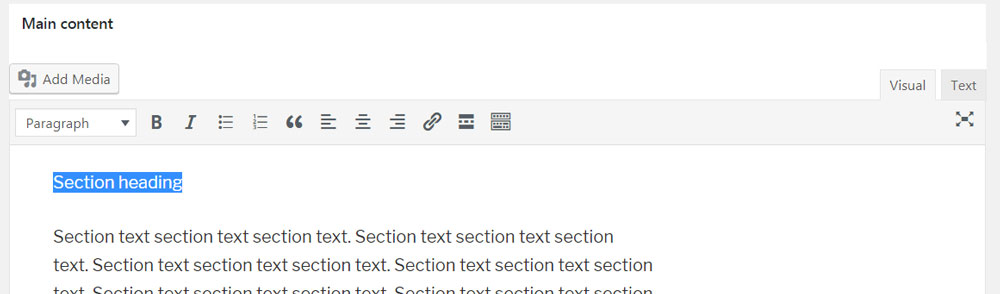
Section titles – it is recommended that you break your article into bite sized chunks to make for easy reading – as we have in this article. Put your section titles in this box, separated by commas and in the order in which they appear in the article. This will allow the website to display “jump” links to each section near the top of article enabling visitors to navigate to their particular points of interest. You can do this part last if that helps.
The publish box allows you to preview the work as it stands on your page, save the current work as a draft or request that the curators pass it to private viewing status where it can sit for peer review and comment by other researchers prior to publishing to the world. Just a quick word of caution here – preview does not save! please remember to save your work before navigating away from the page.
The format box at present can be ignored. We may develop its usage later.
Tags allows you to associate keywords with the article. This helps us link related articles that appear in the “You might also be interested in…” box at the bottom of the post. Pick 1 to 6 keywords you think best describe the subject matter of your article. These can include words and phrases also used by categories as these are used in a different way.
Featured image will appear as a large image at the top of your post and often where your page is linked to on the web such as on Facebook.
Author category – in order to prevent confusion with so many articles being written by so many people research contributors will have only access to the categories they are working on. If a researcher is working on multiple articles they will have to select the appropriate category.
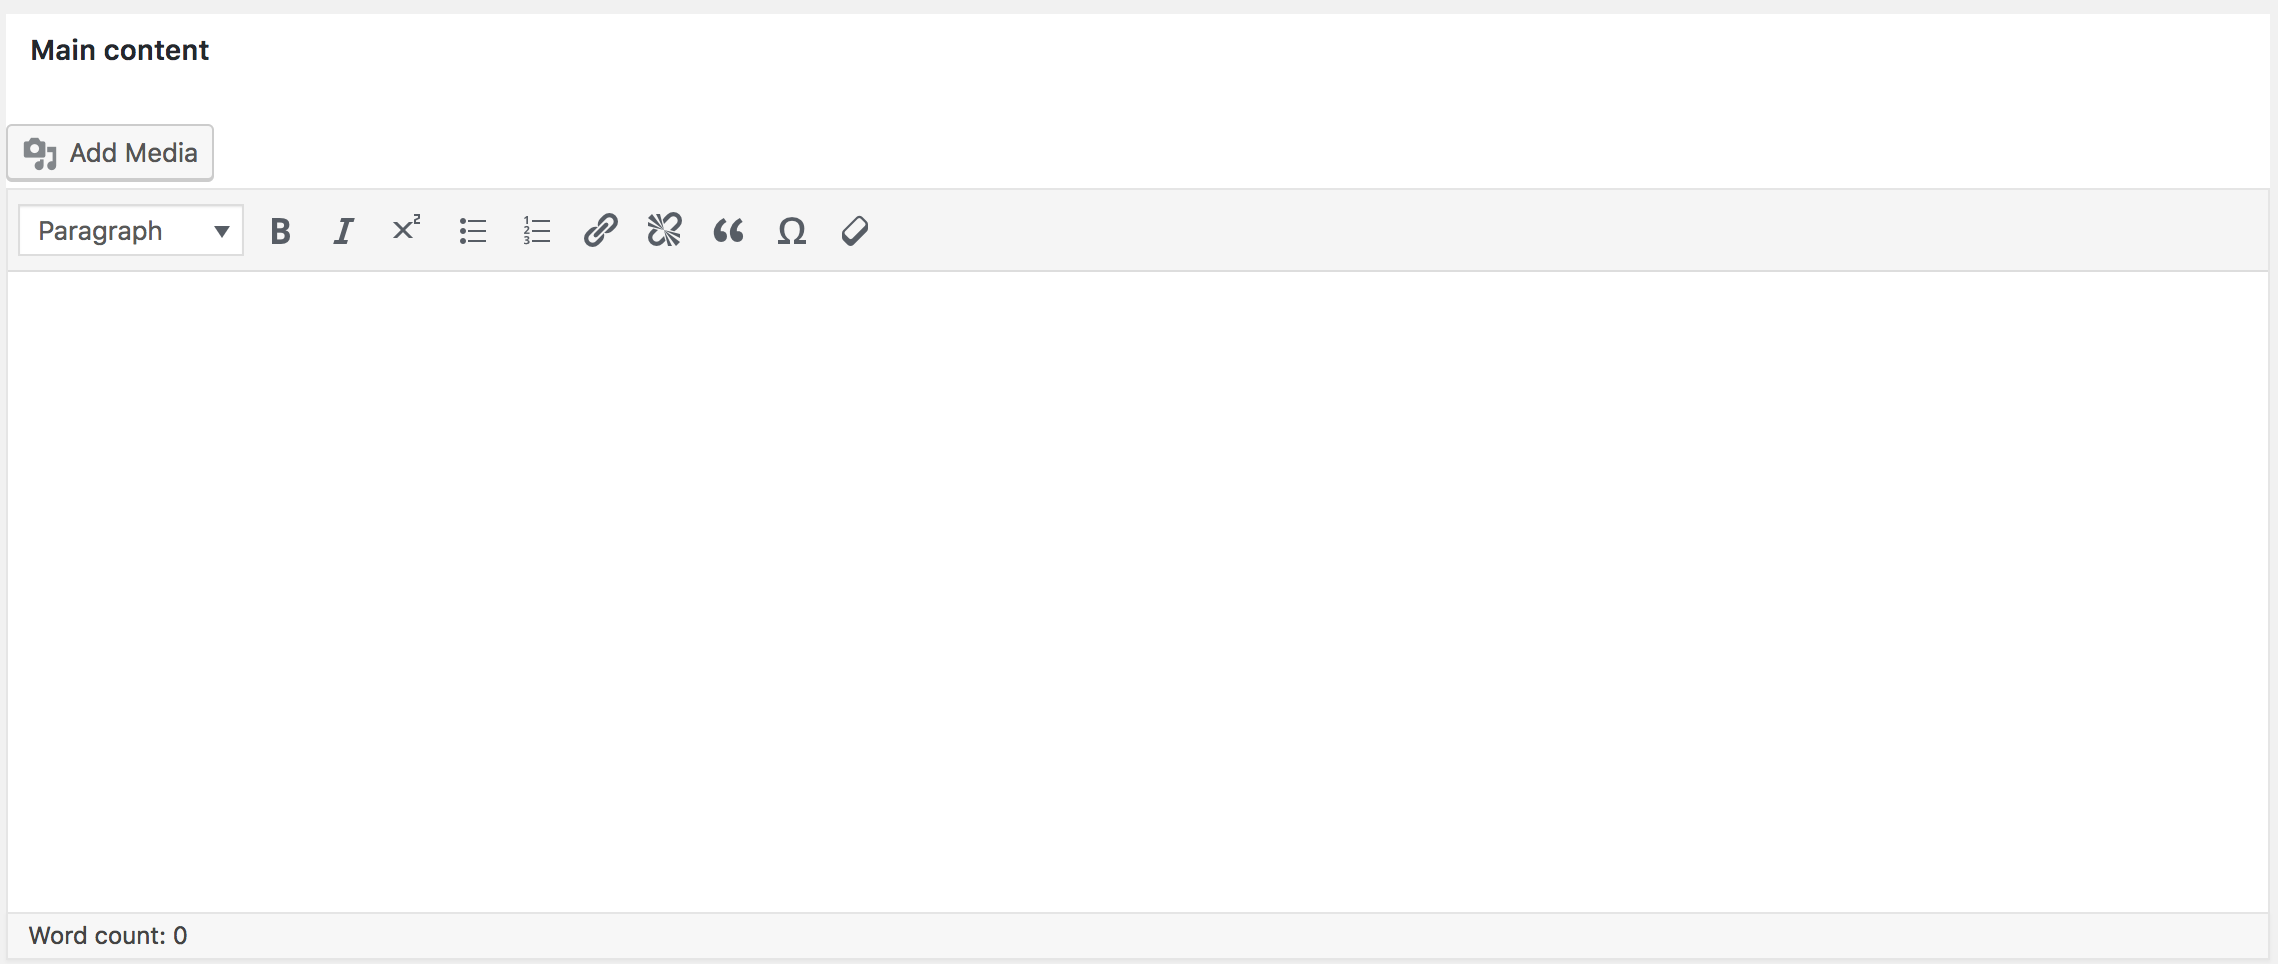
Main content as you would expect is where the text and images that make up your article go.
Text can be typed or copy and pasted in here.
Superscript for creating references is done by highlighting the number and square brackets clicking the X2 button, making [1] become [1]. The number can then be referenced in the reference section.
Section headings are created by highlighting and designating as such from the drop down as below:
Highlight the heading
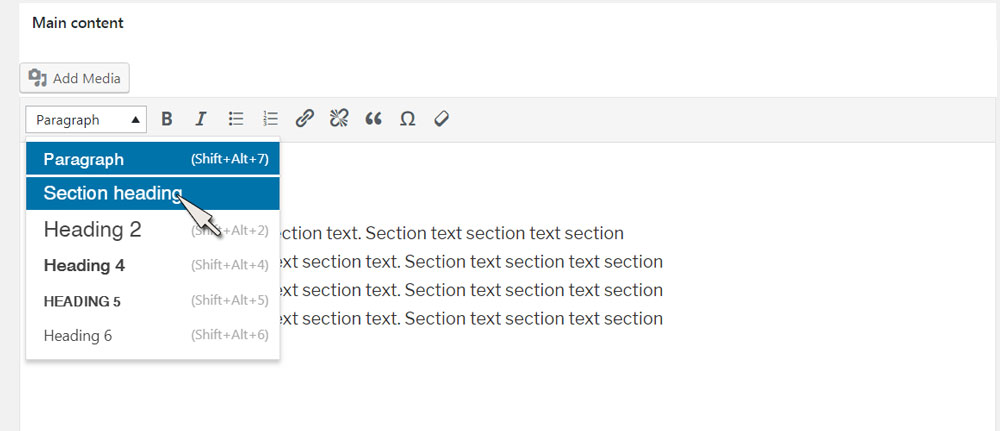
Then from the “Paragraph” dropdown in the menu choose “Section heading”
This will make the heading more prominent and also be picked up behind the scenes making the jump links mentioned earlier function. This is the only time this choice should be made.
There are other heading sizes available for style, however only “Section heading” will create the link as described.
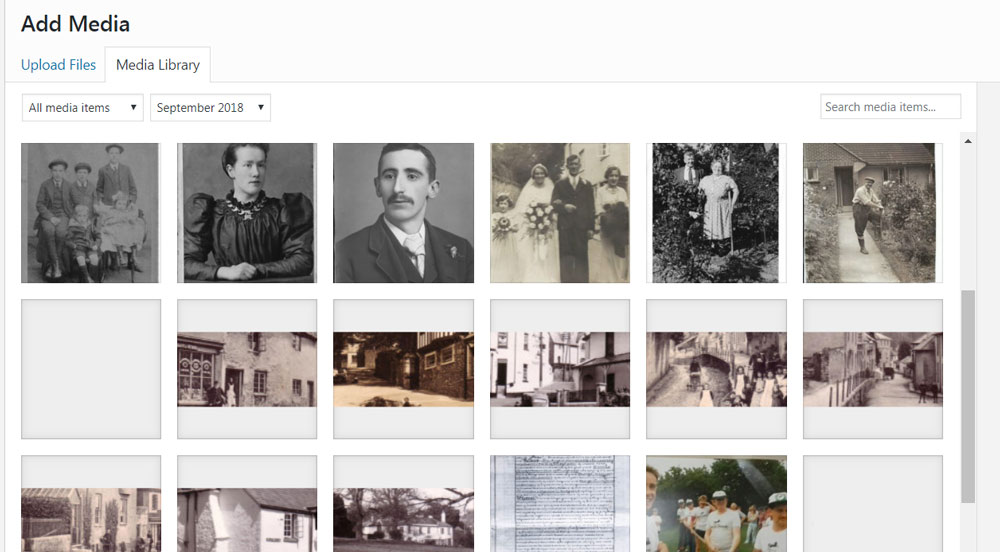
Images can be added by placing the cursor where you want them to appear and then clicking ![]()
This gives access to the media library allowing you to either choose an existing image or upload one or more of your own.
If uploading please take the time to enter information in the boxes on the right below:
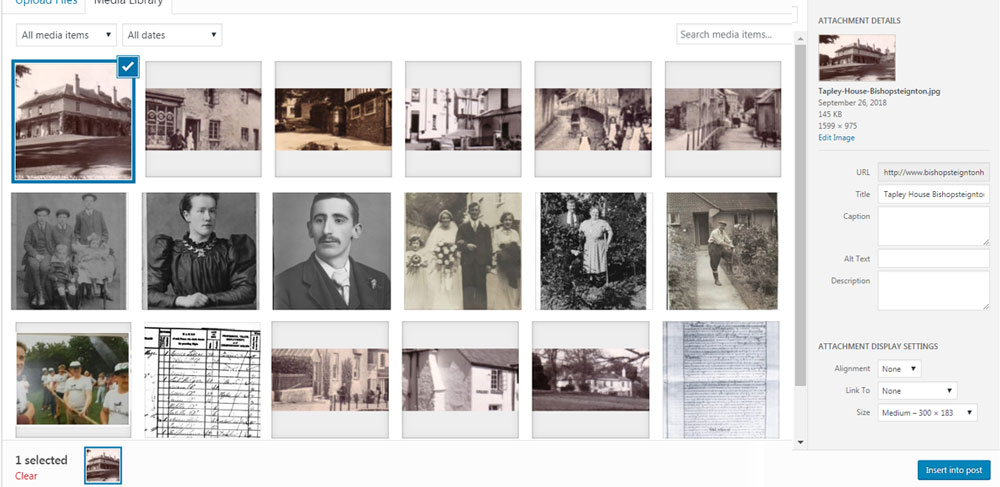
Title – this is pre-filled in from the file name of the uploaded image but can be over-written. It is considered best practice to name image files descriptively for this reason and the fact that it helps with search.
Caption – this appears under some circumstances underneath the image when displayed on the website. This should be a brief description and include any credits as necessary.
Alt Text – This is read by screen readers utilised by visually impaired web users. It is considered very bad form not to include a one sentence description of the image here which may be the same as the title. It is also beneficial for search.
Description – A more detailed version of the information in the Caption section if necessary.
As a minimum each image should have a Title and Alt Text.
You can choose various display options prior to inserting into your article. Alignment can be left, right, centre or none – you will learn best about this by experimenting. There is no need to link to anything from the image, however if the original is much larger than it was practical to use in the article linking to that may be beneficial to the site visitor. WordPress automatically produces various options for size when you upload – pick the most appropriate and then insert.
A word of warning – Never copy text or images from elsewhere on the web. Usually this would contravene copyright and always the search engines take a very dim view of plagiarism.
References and Credits
This last section allows you to provide the references for your research as appropriate and to credit providers or owners of images or other information. Sometimes it may be appropriate to link to other pages on the website or elsewhere
Next Steps
Ok, to get you started we have set up a “Sandbox” category that everyone has access to. This is separate from the rest of the storage and website and provides an area that you can practice and play with without worrying about the consequences.
That said the website is very robust – you can edit, delete and redo your own work as necessary and if you come across a problem you just can’t solve email [email protected] or bring it to one of our future meetings.